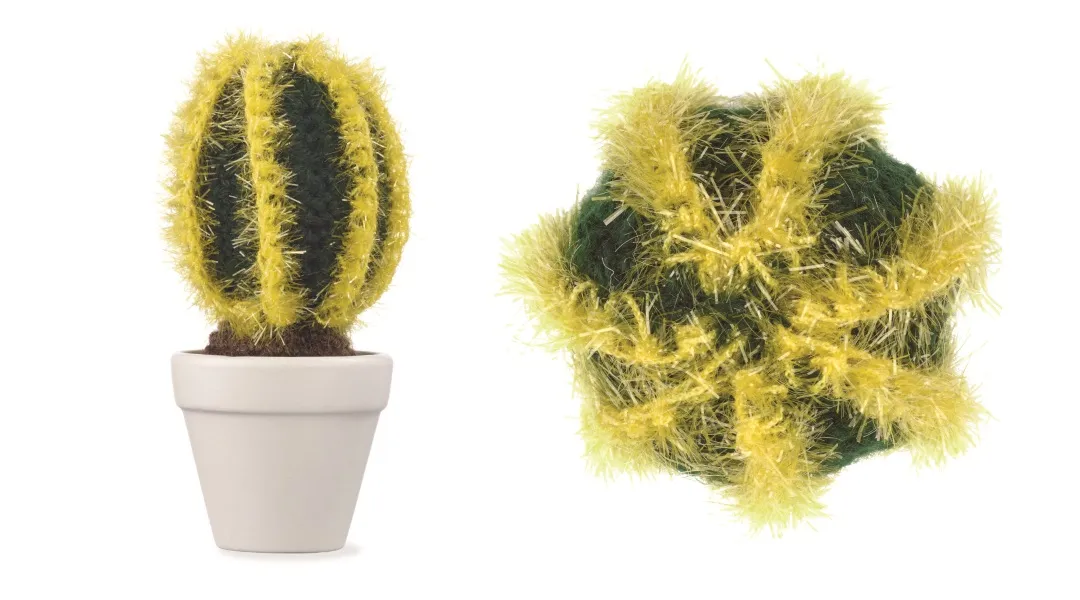
This cactus can grow up to 10ft (33m) tall. If you want to create it in realistic colours, its spines are actually maroon or dark red. The spikes are made with a tinsel or eyelash yarn, so if you like the effect, make them both and display them together.
Finished size
The cactus is approximately 3¼in (8cm) tall and 2½in (6cm) wide.
You will need
Robin Double Knit, 100% acrylic (328yd/300m per 100g ball):
1 ball in 045 Forest (A)
Small amount in 143 Mink (B)
Rico Design Creative Bubble, 100% polyester (98yd/90m 50g ball):
1 ball in 002 Yellow (C)
3.5mm (UK9:USE/4) crochet hook
Tapestry needle
Polyester stuffing
Plant pot approximately 2½in (6cm) in diameter
Tension
Tension is not essential for this project.
Note
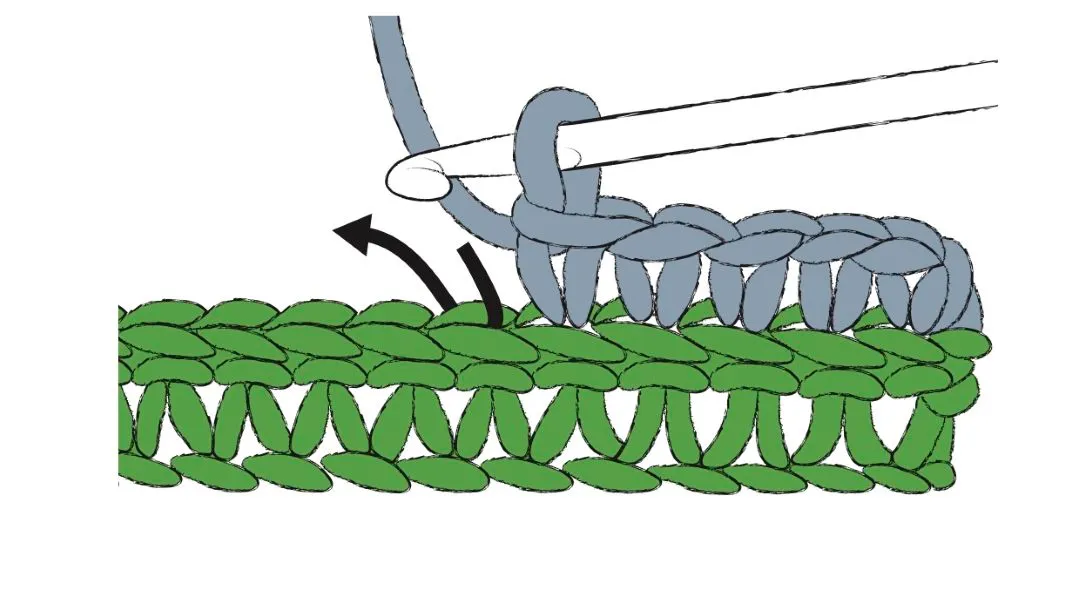
The cactus is worked in rows. The rib is created by working into the back loop of each stitch (see below).
Cactus
Row 1: Using 3.5mm (UK9:USE/4) hook and A, ch 17 sts.
Row 2 WS: 1 htr in 3rd ch from hook, htr into each ch to end, turn (15 sts).
Row 3: Ch 2, htr tbl into each st to end, turn (15 sts).
Row 3 forms the pattern.
Work a further 12 rows.
With RS together, crochet the first and last rows together:
Next row: Ch 1, sl st in every st.
Fasten off and leave a long yarn tail.
Spikes
Using 3.5mm (UK9:USE/4) hook and B, with RS facing, crochet along the ridges created by the htr. Attach the yarn using a sl st and double crochet in each stitch. Fasten off. You will complete 7 rows of spikes.
Soil
Using 3.5mm (UK9:USE/4) hook and C, make a magic ring (see below).
Round 1: 1 ch, 6 dc into the centre of the ring.
Round 2: 2 dc into each st (12 sts).
Round 3: (1 dc, dc2inc) 6 times (18 sts).
Round 4: (2 dc, dc2inc) 6 times (24 sts).
Round 5: 1 dc in each st tbl (24 sts).
Rounds 6–12: Work 7 rounds straight.
Round 13: (2 dc, dc2tog) 6 times (18 sts).
Stuff firmly with polyester stuffing.
Round 14: (1 dc, dc2tog) 6 times (12 sts).
Round 15: (Dc2tog) 6 times (6 sts).
Using a tapestry needle, weave this yarn through the last dc sts of the round and gather hole together. Fasten off and weave in ends.
Making up
Weave in all ends. Make small running stitches along both side seams, and then gather the ends together. Firmly stuff the cactus. Using the yarn tail from the cactus, sew the plant firmly to the soil and place in the pot. Alternatively, cut some floral foam to fit the pot.
Poke a cocktail stick through the base of the cactus, then insert the cocktail stick into the foam to secure the cactus in the pot. Then fill up the sides with small alpine grit. You can crochet a pot for the cactus using one of the patterns you can find below.
Through the back loop (TBL)
Generally, a crochet stitch is made by slipping the hook under the top two loops of a stitch. However, you can also create a different effect by working into the back loop only of each stitch of one round or row. This creates a ridge or horizontal bar across the row. I have used this technique for several projects in this book, including Mexican Giant Cardon, Golden Barrel and Golden Torch.
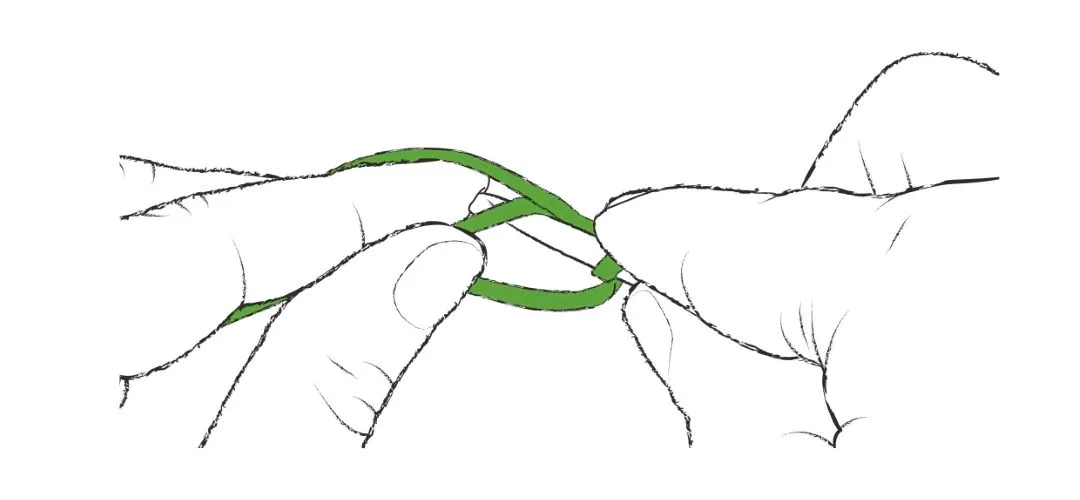
Magic ring
A clever way to start an amigurumi shape is use a ‘magic ring’. This is a neat way of starting a circular piece of crochet while avoiding the unsightly hole that can be left in the centre when you join a ring the normal way. Magic rings are nearly always made with double crochet stitches, as this creates a tight, dense crochet fabric.
1. Start by making a basic slip knot. Pull up the loop and slip this loop onto your crochet hook.
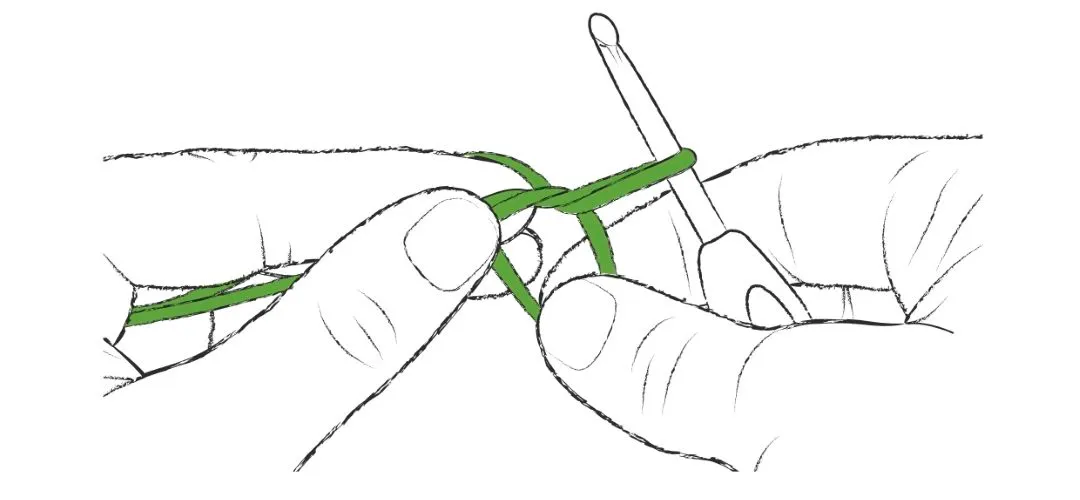
2. Before you tighten the ring, wrap the yarn over the hook (outside the circle) and pull through to make the first chain.
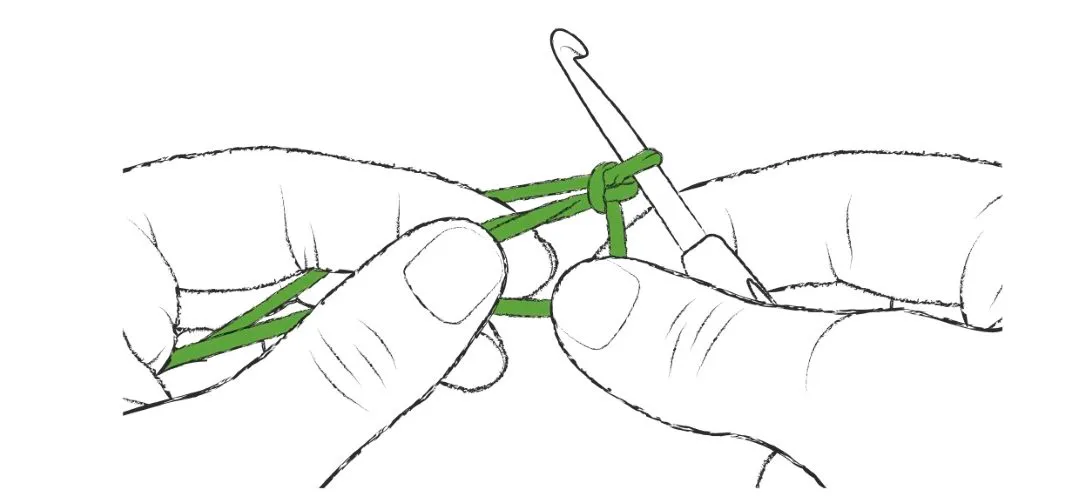
3. Insert the hook into the ring, wrap the yarn over the hook and pull through the ring so there are two loops on the hook.
4. Wrap the yarn over the hook again (outside the circle) and pull through both loops.
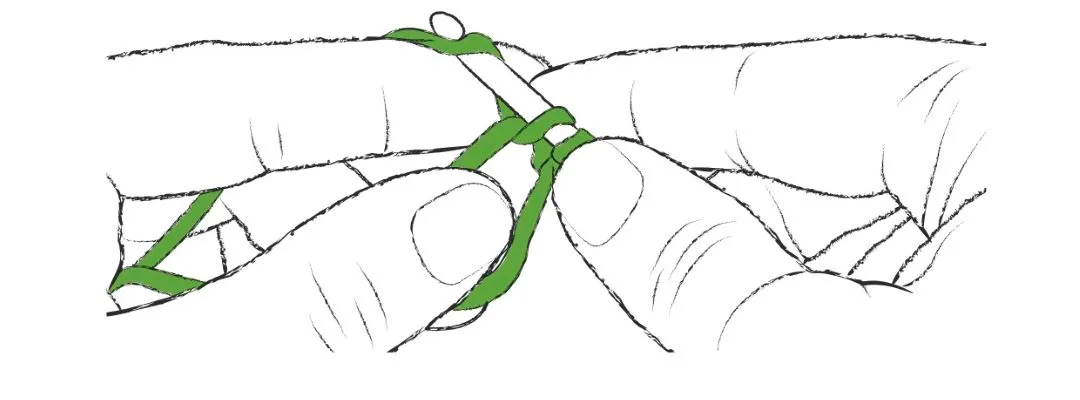
5. You have made your first double crochet stitch.
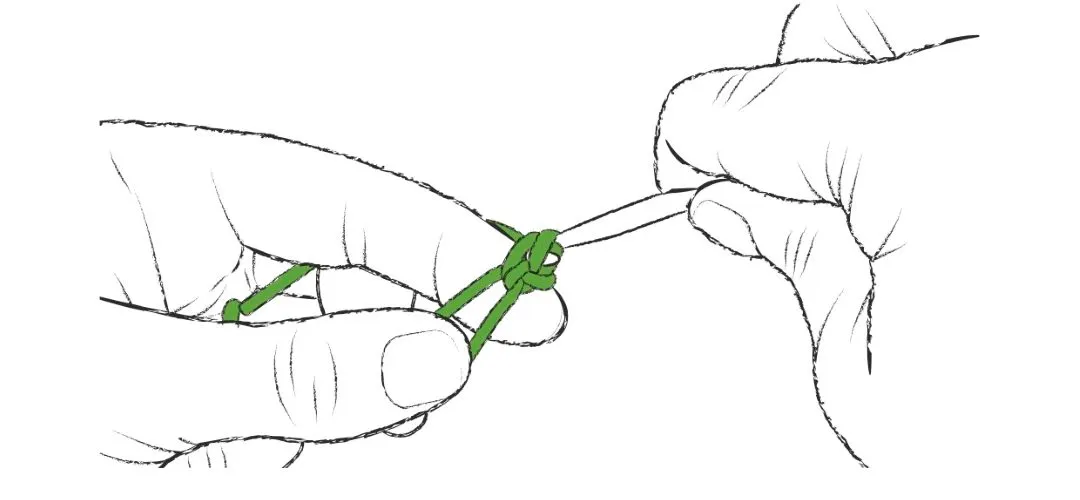
6. Continue to work like this for as many double crochet stitches as are stated in the pattern instructions.
7. Pull the yarn tail to tighten the ring and then continue working in the round as usual.

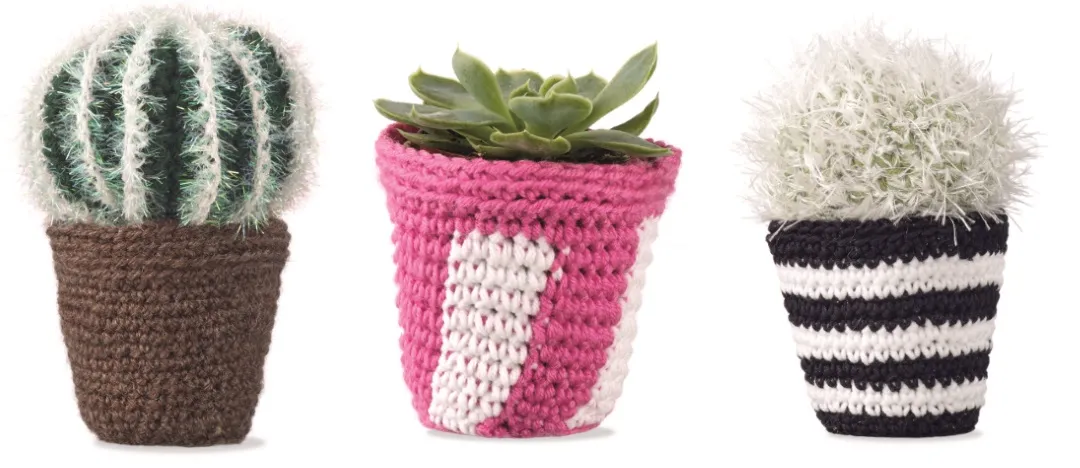
Crocheted pots
You can buy or recycle small plant pots that you have around the home to display your crocheted succulents. But why not crochet your own? If you crochet a pot, you can choose any colours you like. I find it useful to add some structure by covering a cardboard pot used for seedlings.
Finished size
The pot is 2½in (6cm) in diameter at the top and 2in (5cm) in diameter at the bottom. It is 2½in (6cm) high.
You will need
Plain pot
Stylecraft Life DK, 75% acrylic, 25% wool (326yd/298m per 100g ball):
1 ball in 2448 Bark (A)
Striped pot
Rico Essentials Cotton DK, 100% cotton (142yd/130m per 50g ball):
1 ball in 90 Black (A)
1 ball in 80 White (B)
Funky pot
Rico Essentials Cotton DK, 100% cotton (142yd/130m per 50g ball):
1 ball in 14 Fuchsia (A)
1 ball in 80 White (B)
All pots
3mm (UK11:US–) crochet hook
1 x biodegradable pot 2½in (6cm) in diameter
Craft glue
Tension
Tension is not essential for these projects.
Note
Each pot is worked in spirals using the standard amigurumi technique.
Plain pot
Using 3mm (UK11:US–) hook and A, make a magic ring.
Round 1: 1 ch, 8 dc into the centre of the ring.
Round 2: 2 dc into each st (16 sts).
Round 3: (1 dc, dc2inc) 8 times (24 sts).
Rounds 4–5: Work 2 rounds straight.
Round 6: Work 1 round tbl (24 sts).
Round 7: (2 dc, dc2inc) 8 times (32 sts).
Rounds 8–9: Work 2 rounds straight.
Round 10: (3 dc, dc2inc) 8 times (40 sts).
Rounds 11–12: Work 2 rounds straight.
Round 13: (4 dc, dc2inc) 8 times (48 sts).
Rounds 14–18: Work 5 rounds straight.
Rounds 19–20: Work 2 rounds tbl (48 sts).
Fasten off and weave in ends.
Striped pot
Using 3mm (UK11:US–) hook and A, make a magic ring.
Round 1: 1 ch, 8 dc into the centre of the ring.
Round 2: 2 dc into each st (16 sts).
Round 3: (1 dc, dc2inc) 8 times (24 sts).
Rounds 4–5: Work 2 rounds straight.
Round 6: Work 1 round tbl (24 sts).
Round 7: (2 dc, dc2inc) 8 times (32 sts).
Rounds 8–9: Change to B, work 2 rounds straight.
Round 10: Change to A, (3 dc, dc2inc) 8 times (40 sts).
Round 11: Work 1 round straight.
Round 12: Change to B, work 1 round straight.
Round 13: (4 dc, dc2inc) 8 times (48 sts).
Rounds 14–15: Change to A, work 2 rounds straight.
Rounds 16–17: Change to B, work 2 rounds straight.
Round 18: Change to A, work 1 round straight.
Rounds 19–20: Work 2 rounds tbl (48 sts).
Fasten off and weave in ends.
Funky pot
Using 3mm (UK11:US–) hook and A, make a magic ring.
Round 1: 1 ch, 8 dc into the centre of the ring.
Round 2: 2 dc into each st (16 sts).
Round 3: (1 dc, dc2inc) 8 times (24 sts).
Rounds 4–5: Work 2 rounds straight.
In the next row and every following row, work with the two colours, leaving a strand of the colour you are not using just above your work so that it is captured by the yarn you are working.
Round 6: Place a marker at the beginning of each round, (3 dc tbl in A, 3 dc tbl in B) 4 times (24 sts).
Round 7: (3 dc in A, 3 dc in B) 4 times (24 sts).
Round 8: (2 dc, dc2inc in A, 2 dc, dc2inc in B) 4 times (32 sts).
Rounds 9–10: (4 dc in A, 4 dc in B) 4 times (32 sts).
Round 11: (3 dc, dc2inc in A, 3 dc, dc2inc in B) 4 times (40 sts).
Rounds 12–15: (5 dc in A, 5 dc in B) 4 times (40 sts).
Rounds 16–17: Fasten off yarn B and working in A only work 2 rounds straight.
Rounds 18–19: Work 2 rounds tbl (40 sts).
Fasten off and weave in ends.
Making up
Cover the outside of the cardboard pot with some craft glue. Carefully pull the crochet over the pot, making sure the top of the crocheted pot covers the cardboard. Leave to dry.
Extract reprinted here with permission, Crocheted Succulents by Emma Varnam, published by GMC Publications, £14.99, available to buy from www.thegmcgroup.com and all good bookshops
